Despite the huge technological advances in digital imaging in the past few decades, the basic mechanics of taking a photograph have not changed. Digital cameras may have automated the process (or, at least, given us the option to do so) but getting the right exposure still rests on the same three things: shutter speed, ISO, and aperture.
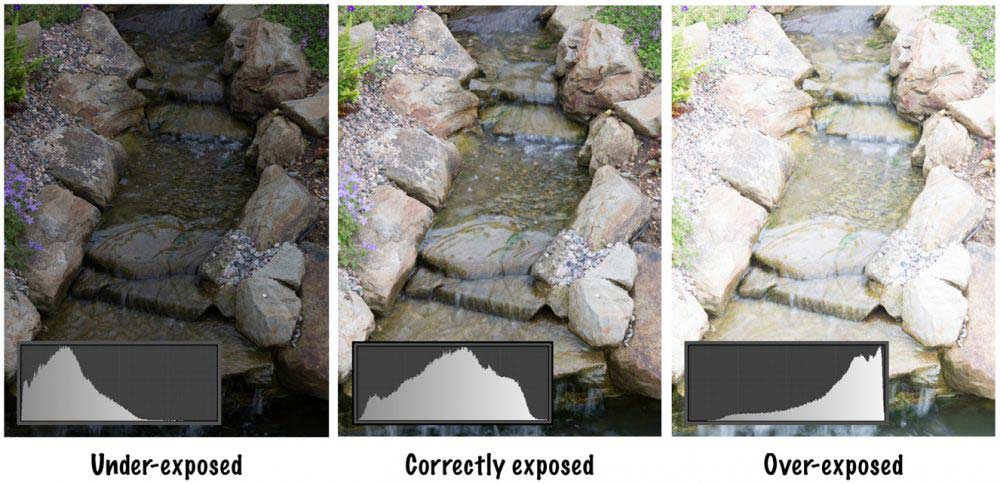
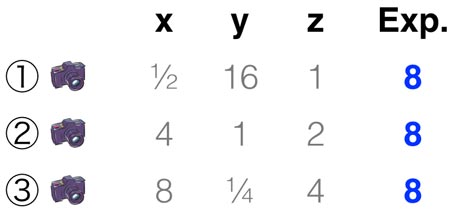
Let’s assume we have a camera with only three settings—a, b, and c—and that in order to produce a photograph the camera multiplies a, b, and c together, each of which can take any of the following values: ¼, ½, 1, 2, 4, 8, 16. Using our camera, a photograph will be taken no matter what values of a, b, and c we choose, and as soon as we press the shutter the camera will spit out the answer to our multiplication—and this will be the exposure of the photograph. For a given scene, let’s say that the correct exposure is “8” such that “4” would mean the image is under-exposed and, likewise, “16” over-exposed. Obviously, there are many ways to take a photograph and get at an exposure of 8. We take three shots:
If left in Auto mode, this calculation is effectively what the camera is doing in adjusting the shutter speed, ISO, and aperture settings to get the correct exposure. But whilst the exposure is the same for each of our imaginary photographs, they would all look very different. Practically all digital cameras have settings such as landscape mode, sports mode, night mode and so on available in the menu system. These selections help the camera to understand which settings are best changed to get to the correct exposure (e.g. if you’re taking a picture of a sports car whizzing past and set your camera to ‘sports mode’ then it knows to set fast shutter speed to avoid blurring—and adjusts aperture and ISO accordingly). It is through using shutter speed and aperture settings creatively as tools (whilst working within the limits of the ISO setting) that we can entirely change the impact of the final image.
Shutter Speed
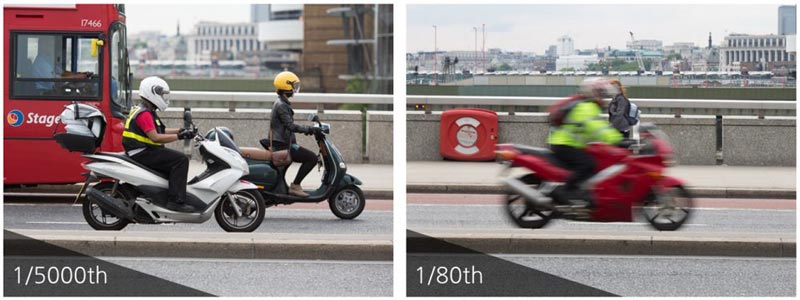
Of the three, shutter speed is the most self-explanatory and intuitive. It is the time, measured in fractions of a second, for which the shutter opens to let light pass through the lens and onto the sensor. It becomes a definite concern when the object in the frame is moving (e.g. flowing water, people, sports photography, etc.), as can be seen from the photographs of the bikes below, both of which have the same exposure.
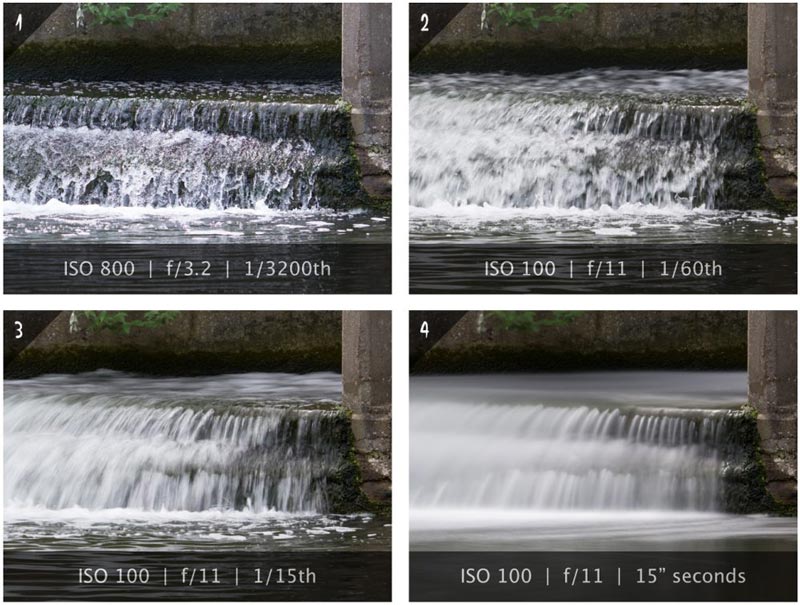
In actuality, very few objects are entirely still. Even if photographing a landscape, trees will sway with the wind and clouds may bumble along overhead. How you choose to render these movements will dictate the best shutter speed for the scene. Again, all the images of the water below have the same exposure (neutral density filters used).
Moreover, unless you have have a sturdy tripod or the ability to turn to stone, your shaking hands will be a limiting factor. Hand-held photography generally requires a shutter speed of 1/125th of a second or less (unless your camera or lens has image stabilization). This does not mean that at shutter speeds of 1/60th you cannot produce sharp images; it is more a question of success rate. In my own experience, with a shutter speed of 1/125th I’ll get a sharp image maybe 75% of the time; at 1/250th this is much closer to 100%.
One upshot of this is that if night photography is your thing, you need a tripod. Cityscapes, or even landscapes at dusk, will likely require shutter speeds of 5+ seconds (not only does the low-light force such a long shutter speed, it’s also a must if you want those car tail lights streaming red lines along the roads like in the photograph above). In such a case, no amount of money spent on lenses or a camera body can substitute for even a budget tripod.
Shutter speeds double as you go up the scale. Most DSLRs have a minimum shutter speed of 1/4000th of a second all the way up to 30 seconds, with the more expensive ones starting at 1/8000th. So we have:
1/8000, 1/4000, 1/2000, 1/1000, 1/500, 1/250, 1/125, 1/60, 1/30, 1/15, 1/8, 1/4, 1/2, 1, 2, 4, 8, 15, 30.
Note that each time you move from left to right you are doubling the amount of light that will hit the sensor (since the shutter is open for twice as long).
ISO
ISO (International Organisation of Standardization) is the acronym used for film—and now digital sensor—sensitivity. Like shutter speeds, the number used to indicate the sensitivity doubles with each notch up, starting from the least sensitive, ISO 100, through ISO 200, 400, 800, and so on, all the way up to ISO whatever-technology-allows. With each doubling of the ISO you need half as much light to get the same exposure. Coupling this with the shutter speed means that for a given aperture, ISO 200 with a shutter speed of 1/125th will give the same exposure as ISO 400 and 1/250th. It’s the same as saying: 2 x ½ = 4 x ¼. Double the sensitivity, halve the shutter speed.
Aside from the ability to review images instantly and snap away without concerns of film and development costs, one of the gifts of the digital era is the ability to change the camera’s ISO setting at the flick of a button. With film cameras, you would buy an ISO 100 or ISO 400 roll of film and be stuck with it until you finished the roll.
For digital cameras, if the explanation ended there then the ISO setting would simply be a balancing tool, leaving you free to play around with shutter speed and aperture, changing the ISO only before taking the shot to get the correct exposure setting. Unfortunately, it’s not quite that simple. Like film, the quality of the photograph that digital sensors are able to take deteriorates as the ISO level increases — and this deterioration shows in the form of noise. If you look at the blown up section of the image to the right, you can see that the black jacket is mottled with bits of grey and white, as if the photograph were lightly covered in dust. This is noise.
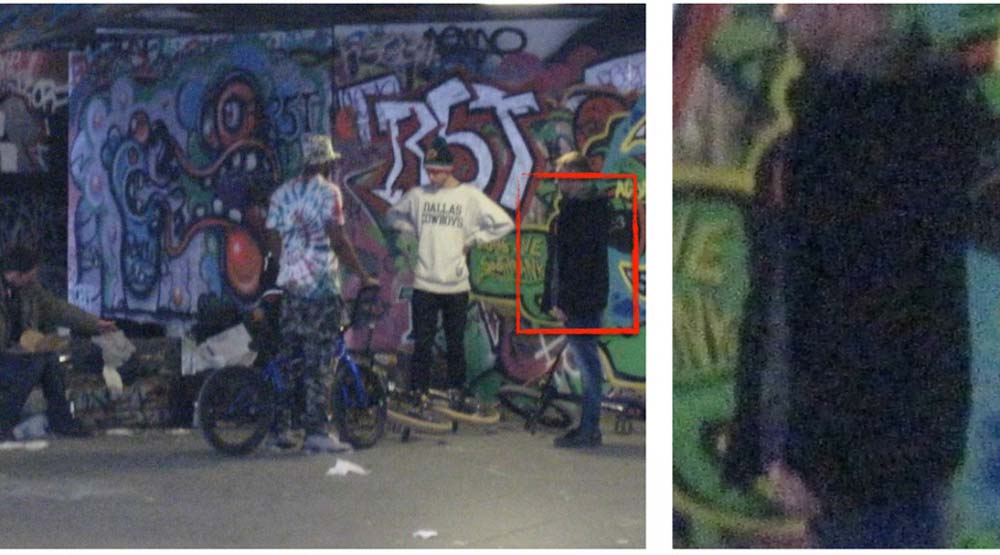
The bottom line is that you ideally want to keep the ISO setting as low as possible for cleaner, smoother images with better colour-rendition—ISO is not a tool but a constraint in the triangle.
Aperture
Last but by no means least is aperture—the least intuitive of the three. Also known as lens speed, aperture (which literally means a hole or a gap) controls how much light the lens lets pass onto the sensor through a mechanism built into the lens itself. It is measured in “ƒ-numbers” (e.g. ƒ/1.8, ƒ/5.6, although on the lens itself this will likely be expressed as 1:1.8 and 1:5.6). The lower the number the “faster” the lens and the more light it can let through.
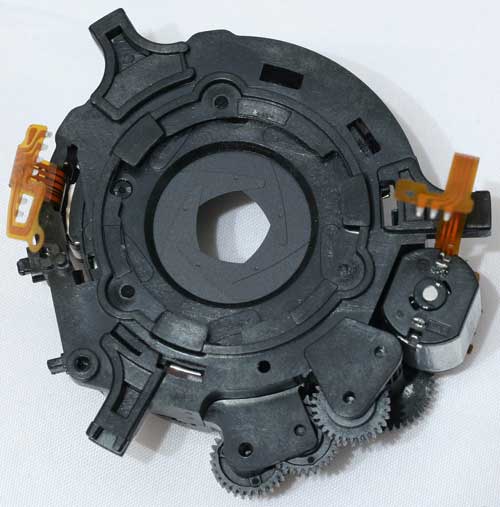
To be clear, if you go out and buy an ƒ/1.4 lens, the “1.4” denotes the fastest the lens will go. Nothing is stopping you shooting an ƒ/1.4 lens at ƒ/4.0, for instance—you just change the ƒ-number in camera. The lower this ƒ-number the more light that the camera lens will let through once you press the shutter (when your composing a scene through the viewfinder the lens always lets as much light as possible through). Here is an example of how the aperture might look at different ƒ-numbers.
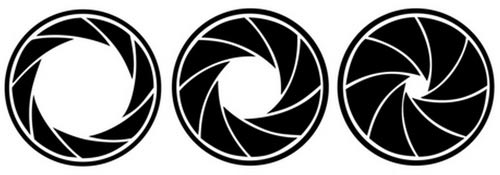
First some terminology. If you shoot an ƒ/1.4 lens at ƒ/1.4 then you say you’re shooting “wide-open” (i.e. the hole through which light passes is as wide as possible for that lens). If you shoot an ƒ/1.4 lens at ƒ/8 then you say you’re “stopping down.” Shooting an ƒ/1.4 lens at ƒ/1.4 means that you’re shooting at its maximum aperture; stopping down to ƒ/22 will mean you’re shooting at its minimum aperture (we’re talking about the size of the hole the lens lets through—not the magnitude of the ƒ-number itself)
In practice, your choice of ƒ-number can have a major impact on how your shot turns out. This is because as the ƒ-number gets lower the depth of field—the distance behind and in front of the point of focus which can be considered sharp—gets smaller. All of which is better explained with a diagram:
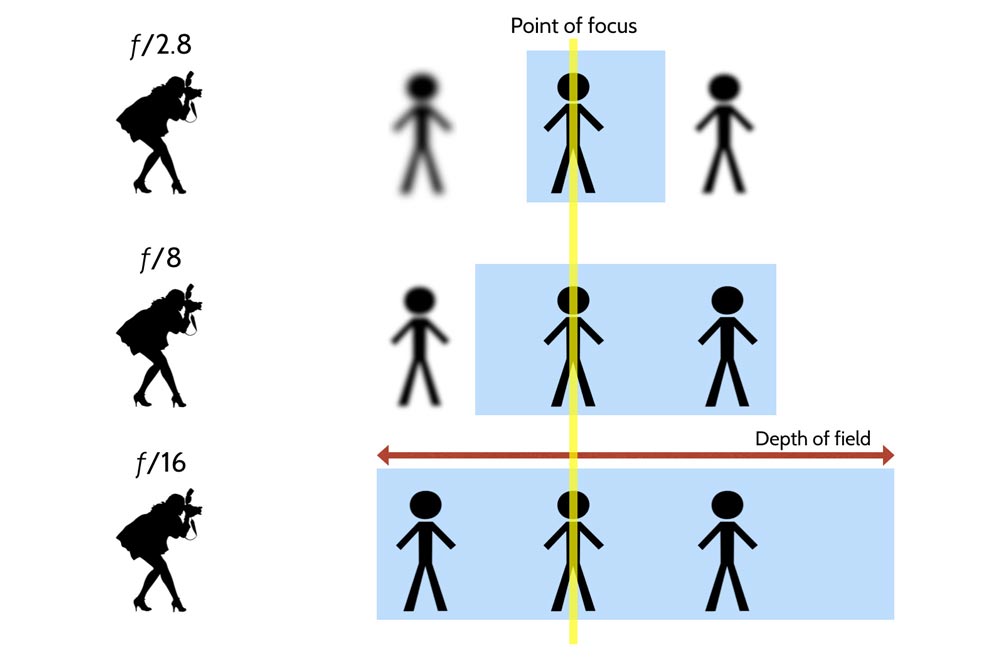
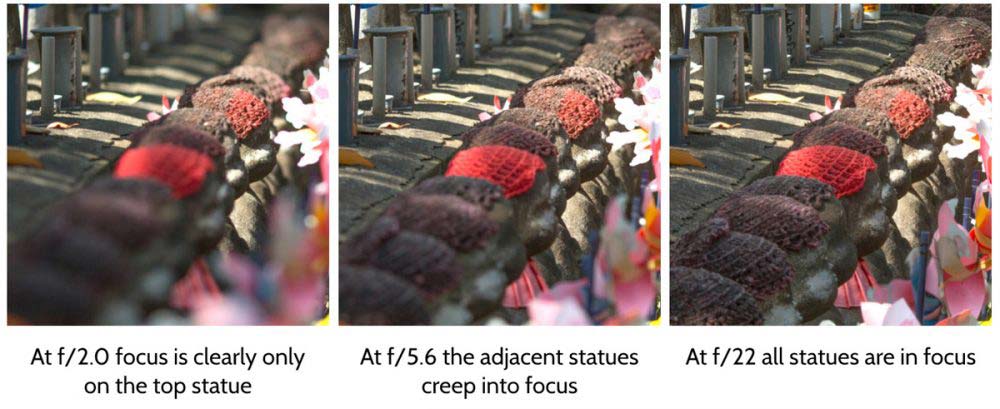
Now, here’s the ƒ-number scale in one-stop increments (most cameras would let you change in 1/3 increments):
ƒ/1.0, ƒ/1.4, ƒ/2.0, ƒ/2.8, ƒ/4.0, ƒ/5.6, ƒ/8, ƒ/11, ƒ/16, ƒ/22, ƒ/32 (most lenses won’t go beyond ƒ/22).
With each one-stop increase in the ƒ-number the amount of light that passes onto the sensor is halved. Rolling this all up with shutter speed and ISO we therefore have the following three settings all giving identical exposures:
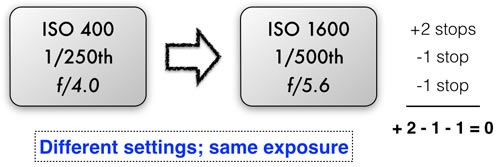
The best way to work out the changes is using a +1, -1 method. Take the first setting: ƒ/4.0 + ISO 400 + 1/250th. Below each write ‘0’ such that we have 0 + 0 + 0 = 0. Now each time you step along the scale, note the number of steps and whether you’re increasing light or sensitivity or decreasing, remembering all the time that the final sum must equal zero for the same exposure. To get to ƒ/5.6 + ISO 1600 + 1/500th, for instance, from the first setting we have:
And since +2 – 1 – 1 = 0, we know that we have the same exposure!
