
Climbing Mount Fuji
Mount Fuji (富士山, Fujisan) stands in Shizuoka Prefecture about 100 kilometers west of Tokyo. It is Japan’s highest mountain at 3,776 meters, and has been revered for millennia—its snow-capped peak and perfectly tapered slopes the subject of countless works of art. Climbing the mountain is a rite of passage for many Japanese and about 300,000 people tread up one of the four main trails every year (the weekends of late July and August see about 8,000 people ascend the mountain each day), many to see the sunrise from the summit.
Climbing the mountain is increasingly popular with tourists because it doesn’t require any technical expertise, and with direct buses from Shinjuku to the trail starting point, it is also very easy to reach. However, due to its popularity, new regulations including a mandatory entry fee and a daily climber cap have been introduced. The below is a guide for first-time climbers to ensure a safe, compliant, and enjoyable climb.
When can I climb?
The official climbing season is from early July to mid-September. Outside of these months the huts on the trails close and an ascent of the mountain is dangerous and strictly discouraged. Specific opening dates for each of the four trails are announced annually on the official Mount Fuji climbing website.
What routes can I take?
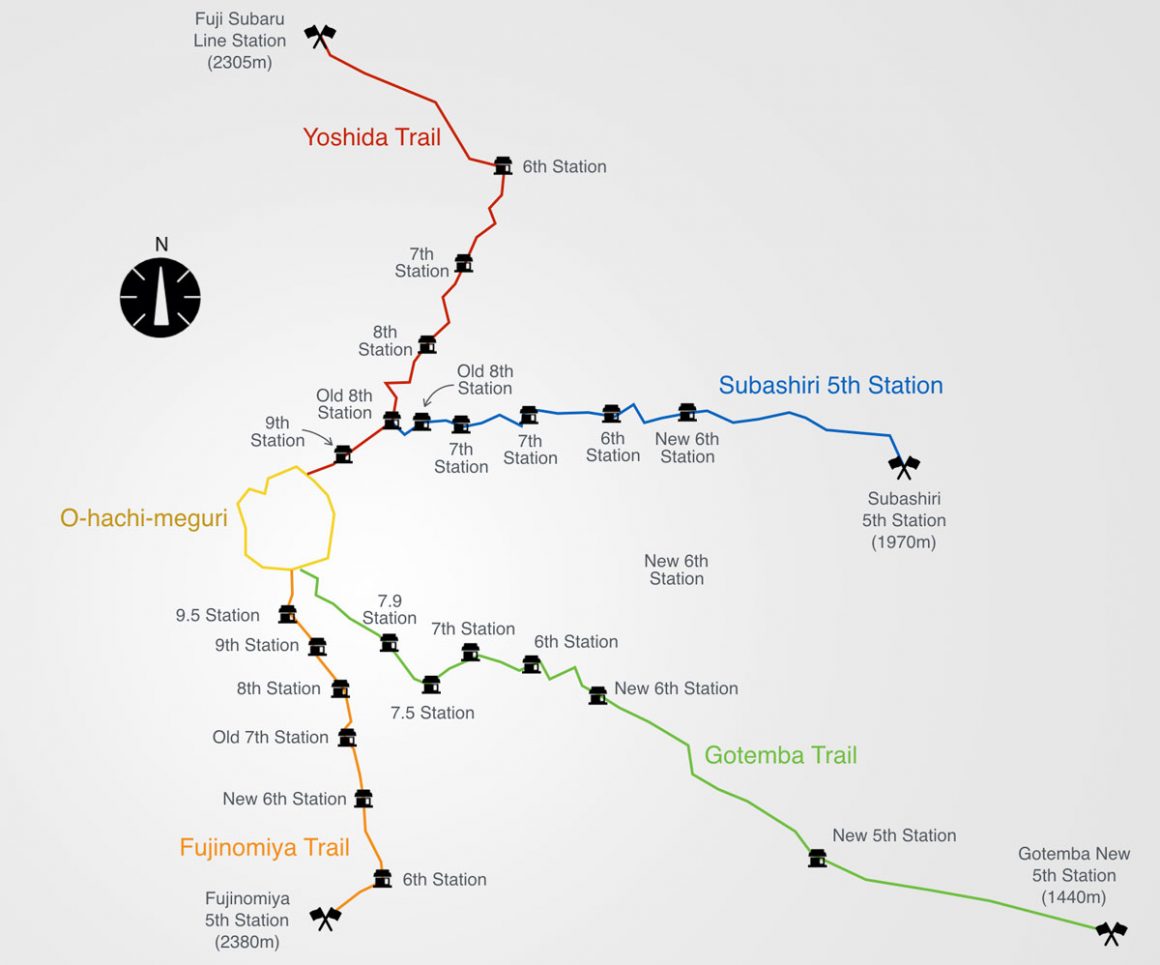
There are four main routes up Mount Fuji which vary in popularity and difficulty. Note that as of recent regulations, the most popular trails now require an entry fee and pre-registration to obtain a QR code for entry.
- Yoshida Trail. This is the most popular route taken by 70% of climbers. Good facilities at the start and many huts along the route. It now has a daily cap of 4,000 climbers.
- Fujinomiya Trail. The second most trodden route after the Yoshida Trail. One shop and information office at the start of the trail. Descent is along the same route as the ascent which may lead to congestion.
- Subashiri Trail. Starting station is not well developed. Meets the Yoshida Trail at the Old 8th Station hut. Harder then both the Yoshida Trail and Fujinomiya Trail.
- Gotemba Trail. The longest and most difficult trail (starting point is 1,440m), but the Osunabashiri (“Great Sand Run”) down is one of the quickest, letting you descend in leaps and bounds for the small price of a boot full of sand. Very few huts along the trail (the first is at 3,000m).
The Yoshida Trail is by far the most popular, especially among tourists and first-time climbers of the mountain. It is one of the easiest routes with shops and restaurants at the start, and many huts where you can purchase water, snacks, and hot food along the route to the summit. The rest of this post will be a guide to climbing via this trail, but much of the advice applies to the other routes, as well.
The Yoshida Route
Firstly, while an ascent of Mount Fuji does not require any specialist training or technical climbing gear it is nevertheless difficult: you will need to cover a vertical distance of 1,400m and contend with a significant temperature difference between the starting point and the summit, as well as the possible onset of mild altitude sickness. You need to be reasonably fit and well prepared to make a safe ascent and descent of the mountain.
Gate Closure Warning: To discourage dangerous “bullet climbing” (ascending without sleep), the 5th Station gates on the Yoshida route now close from 4:00 PM to 3:00 AM. Only climbers with a confirmed mountain hut reservation are allowed to pass during these hours. Marshals will also perform gear inspections at the trailhead; entry may be denied if you are wearing inadequate footwear or lack proper waterproof clothing.
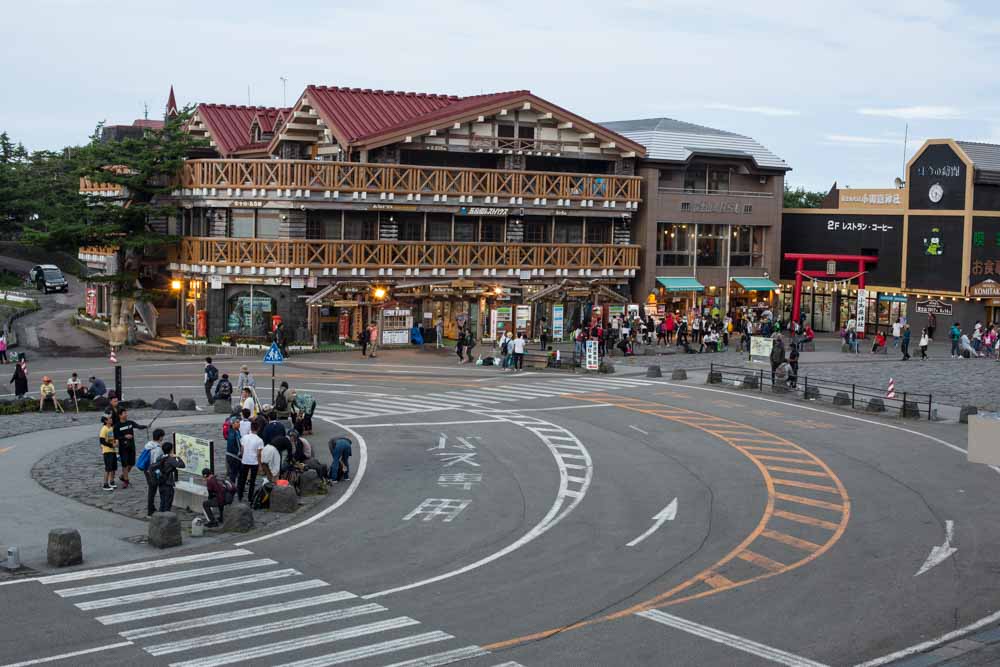
Almost all climbers of the Yoshida Trail start from the Subaru Line 5th Station. Here there are a few restaurants, gifts shops that also sell a limited range of outdoor gear, toilet facilities, and an information desk. You must present your pre-registration QR code at the entry gate here. The route to the summit from the Subaru Line 5th Station is 5.8km and takes 5-7 hours.
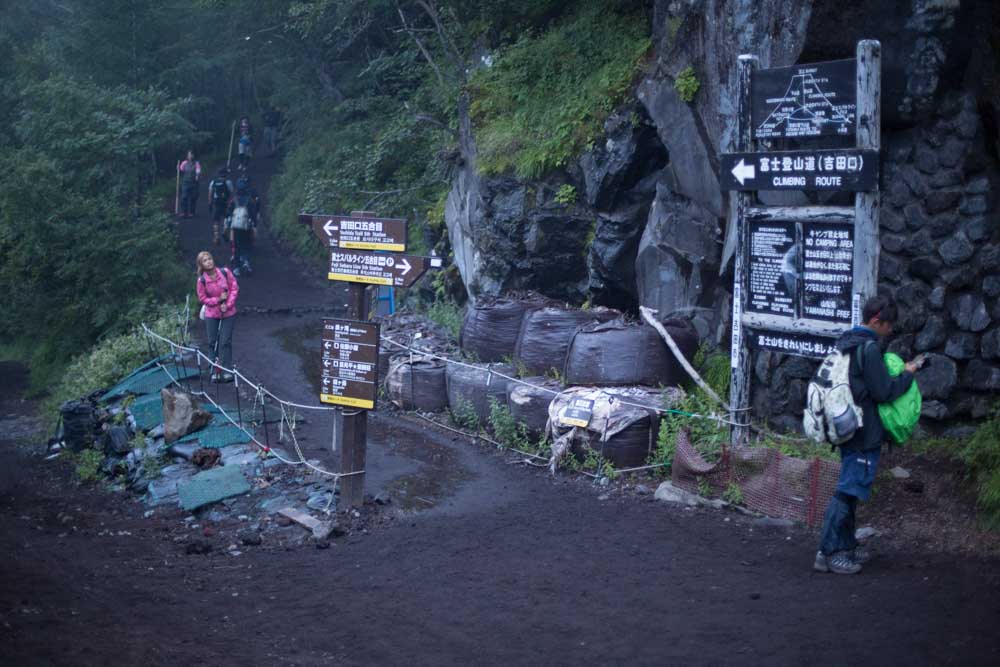
The initial section of the route is actually a walk down a wide, muddy trail which has some wondering if they’re heading in the right direction. The climb starts after a few hundred metres when you will see a sign for the summit and a narrow, rockier trail leading upwards. You will pass this point again on your way down.
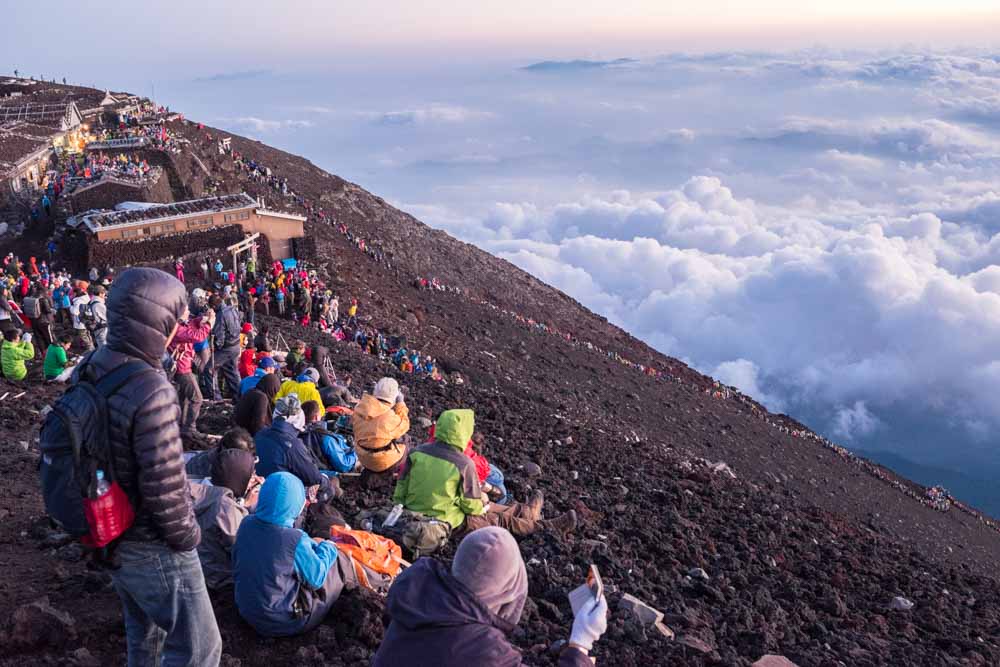
The walk to the 6th station takes just under an hour. From here the path becomes steeper and very craggy, requiring a bit of scrambling in places, but the stations are fairly evenly spaced providing ample opportunities to take a rest before the next section. Depending on the time, bottlenecks are common at certain points on the trail, but if you’re ahead of the groups that flock out of the huts around midnight then this shouldn’t be a problem.
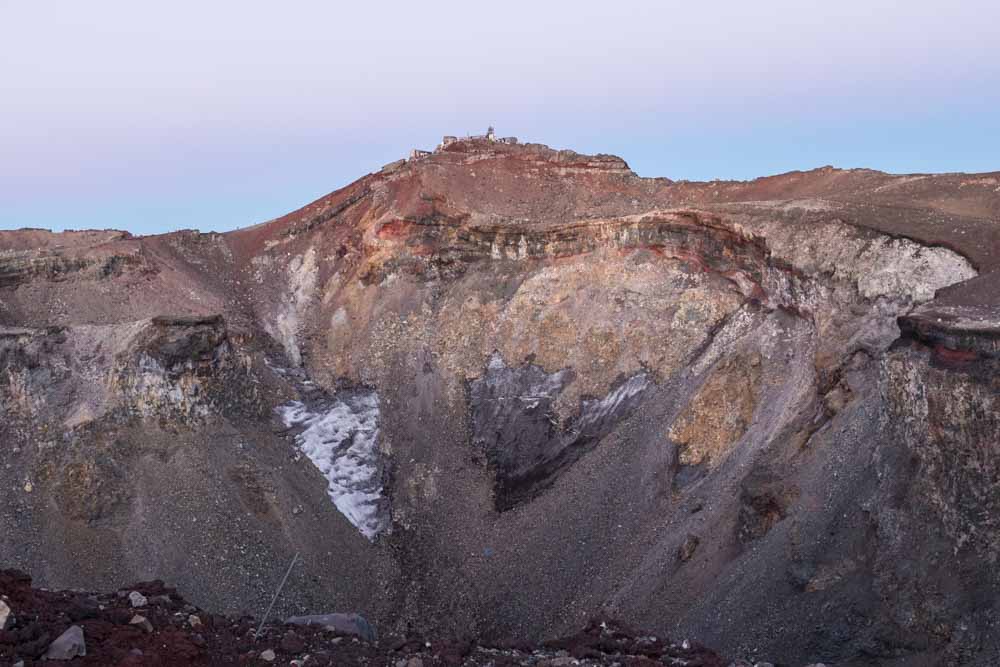
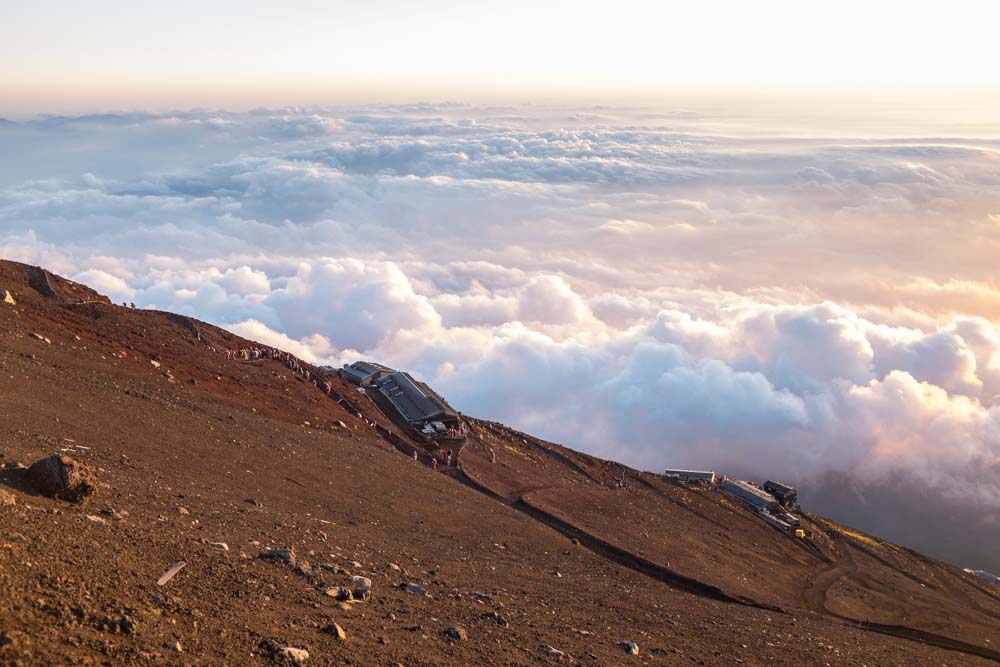
The huts at the top of the mountain are at 3,715m, but although the signs read “summit” this isn’t technically true: the true summit of Mount Fuji is Kengamine Peak at 3,776m. It is reached via the O-hachi-meguri trail—a 4 kilometer course around the crater of the mountain. Extreme care is needed when walking this trail in bad weather.
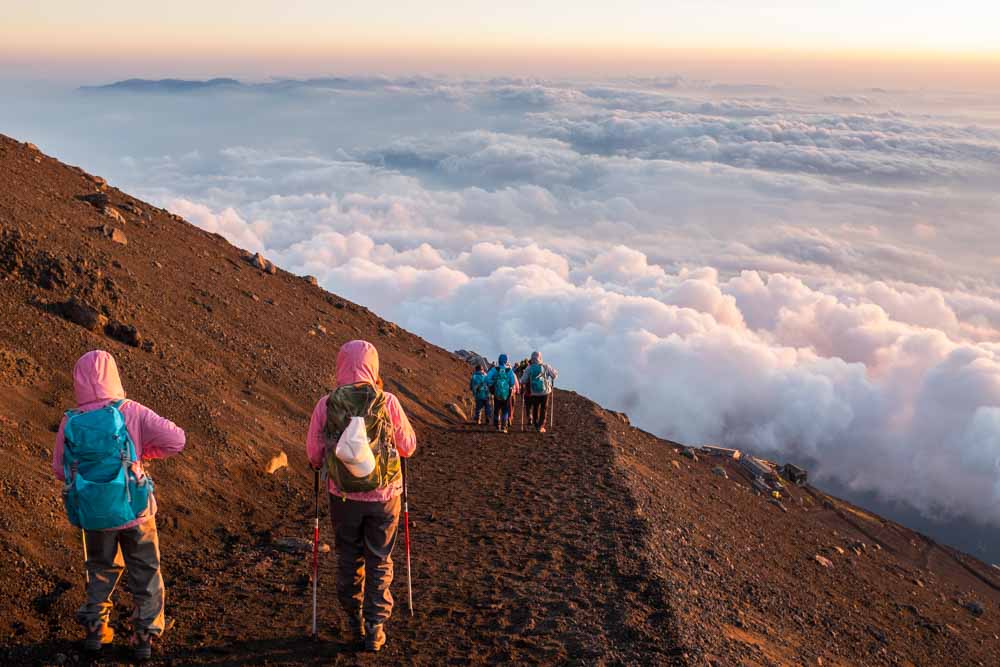
The descent for the Yoshida Trail is to the left after you’ve walked past the row of huts at the summit. It is a 6.9km trail that feels interminable because for the most part it just zig-zags down the mountain, which is exceptionally tedious and hard on the knees. Furthermore, the dry rock surface is extremely easy to slip on—trekking poles are a huge help in keeping yourself stable. Some do hurtle down the path as that seems like the easier option over constantly holding yourself back, but the rocks are large and it’s easy to twist an ankle so doing so is not advised. On clear days, however, the views over the clouds and onto the green fields below are spectacular. Note that there are no huts on the way down and only two toilets.
Ways to tackle the ascent
Not everyone choses to see the sunrise from the top of Mount Fuji: some make an ascent in the morning and are sipping sake and congratulating themselves at their hotel by evening; others choose to climb in the evening without rest at one of the mountain huts. How you choose to climb will determine what you need to take and how you need to prepare.
(1) Day climb and descent
Set off from the Subaru Line 5th Station early in the morning (ideally, before 9am) and aim to reach the summit in the early afternoon. Enjoy the views and start the descent before 3pm to get back by nightfall.
Pros…
- The easiest way to climb the mountain
- Do not have to deal with such large changes in temperature between night and day
- You can enjoy the views on the way up
Cons…
- You won’t get to boast that you’ve seen the sunrise from the top of Mount Fuji!
(2) Stay at a lodge and finish the ascent at night
Set off from the Subaru Line 5th Station in the morning (between 10am and midday) and aim to arrive at a lodge near the 7th or 8th stations in the evening. The lodges need to be booked in advance and cost typically ¥12,000-18,000 per person including meals. Resting at a lodge will break up the climb and let your legs recover—recommended for those who are not so physically fit. The lodges also serve hot food and some provide food for the rest of the climb. Note that having a confirmed hut reservation allows you to enter the trail even after the 4:00 PM gate closure.
Depart for the summit around midnight to arrive in time for the sunrise (around 4:30-5:00am). After watching the sunrise start the descent to get back to the Subaru Line 5th Station for around 9am.
Pros…
- Easiest way to see the sunrise.
- Recommended for those who aren’t sure if they have the stamina to make the ascent in one go
- You can enjoy the views on the way up
Cons…
- Expensive. A stay at one of the lodges is costly and not particularly comfortable. You’ll typically be given no more than a space to spread your sleeping bag and bunch up against other climbers.
(3) Start the ascent in the evening without stopping
Important Note: This is now strictly prohibited on the Yoshida Trail unless you pass the 5th Station gate before 4:00 PM, as gates close to those without hut reservations to prevent dangerous “bullet climbing.” For those who do set off early and climb without a hut stay: depart from the 5th Station in the afternoon, arrive at the summit in time for the sunrise, and start the descent to get back to the 5th Station for around 9am.
Pros…
- Cheapest way to see the sunrise because you don’t pay for accommodation.
Cons…
- Physically demanding. You will basically need to hike for 6-10 hours with only short breaks and the first chance to sleep will be on the bus the next morning. It also carries a higher risk of altitude sickness and exhaustion.
Tips to see the sunrise
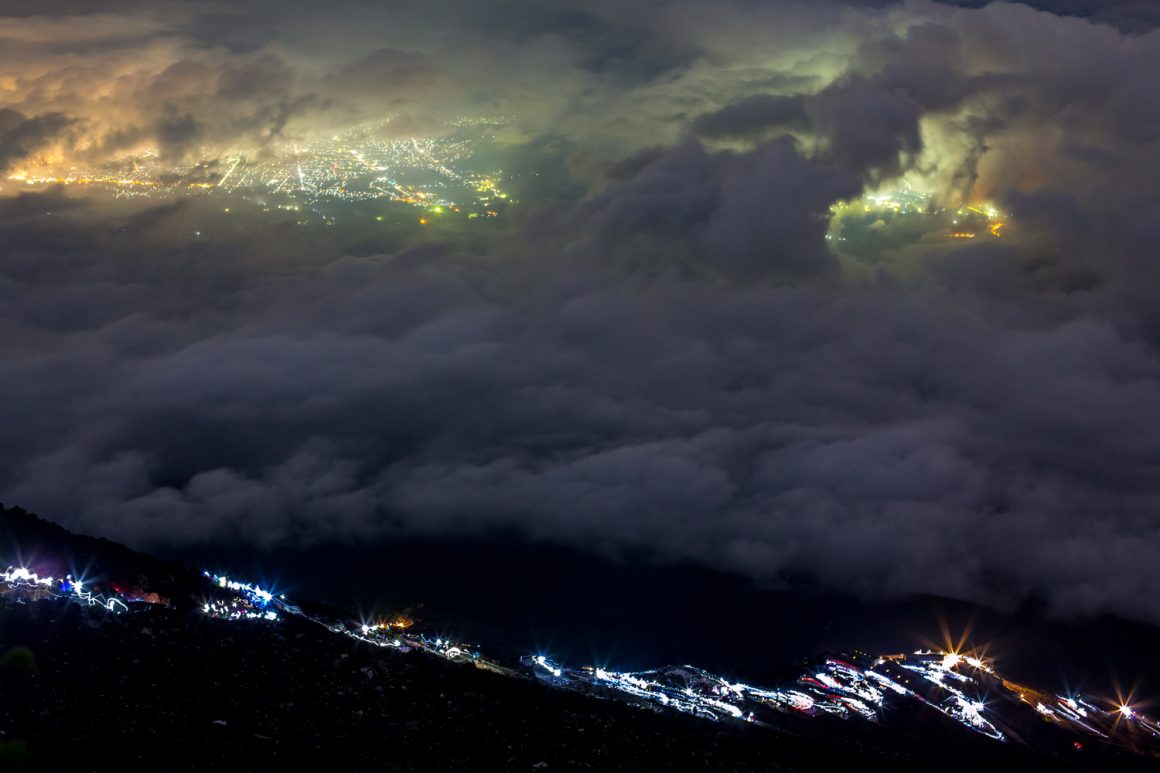
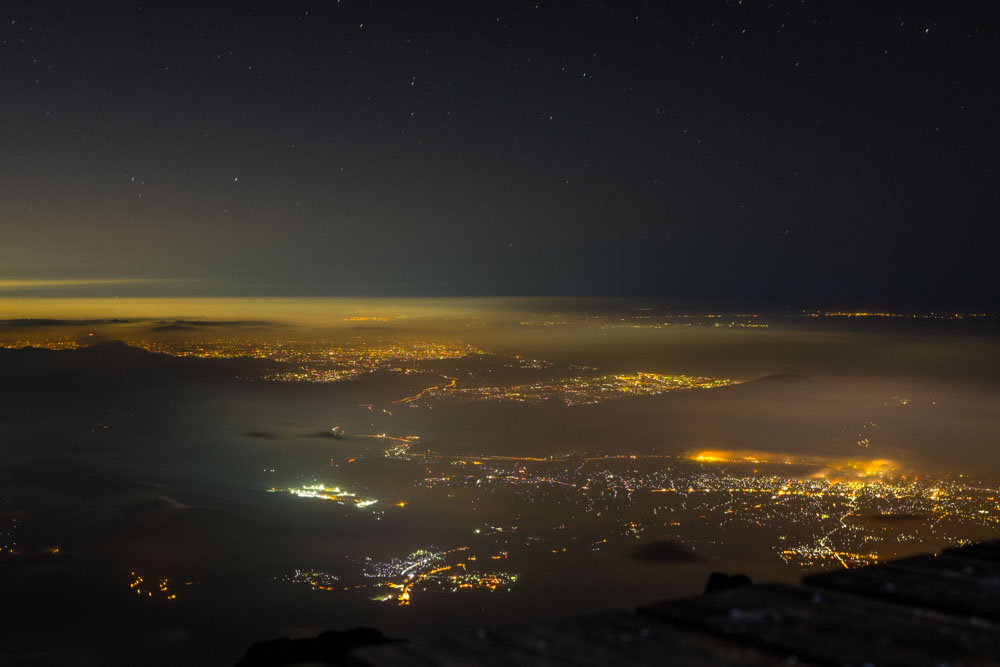
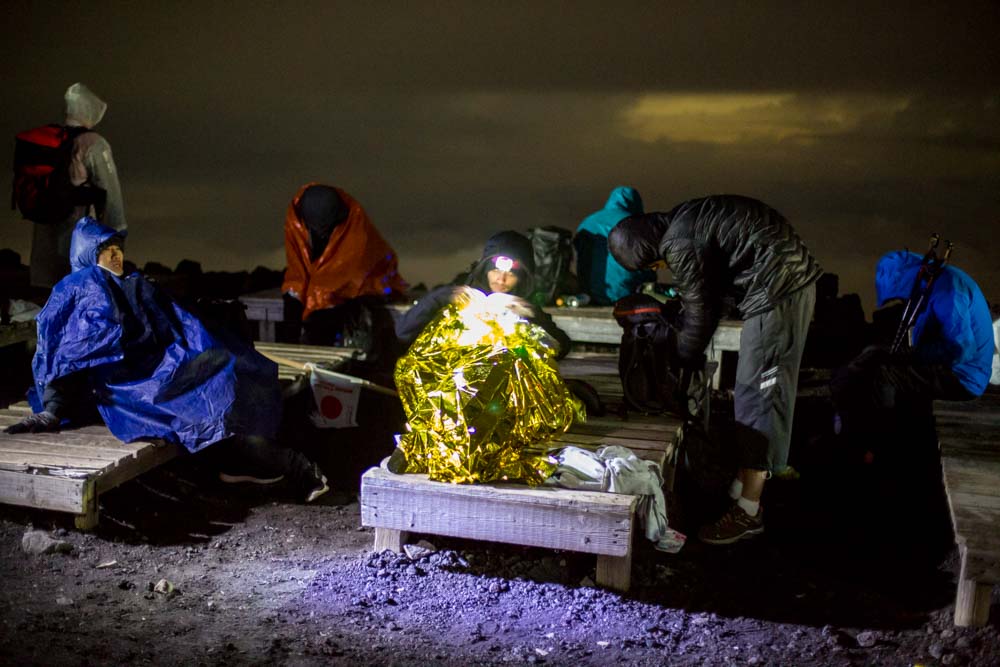
You should check the official time of sunrise beforehand but during the official climbing season it is between 4:30am and 5:00am. That means you want to reach the top at least an hour before because (1) the starlit sky with the city lights below is equally spectacular, and (2) the trail to the summit can become extremely crowded and the resulting bottlenecks can mean significant delays. If you don’t allow for this in your schedule then you risk being a few hundred meters away from the summit as the sun peeks over the clouds.
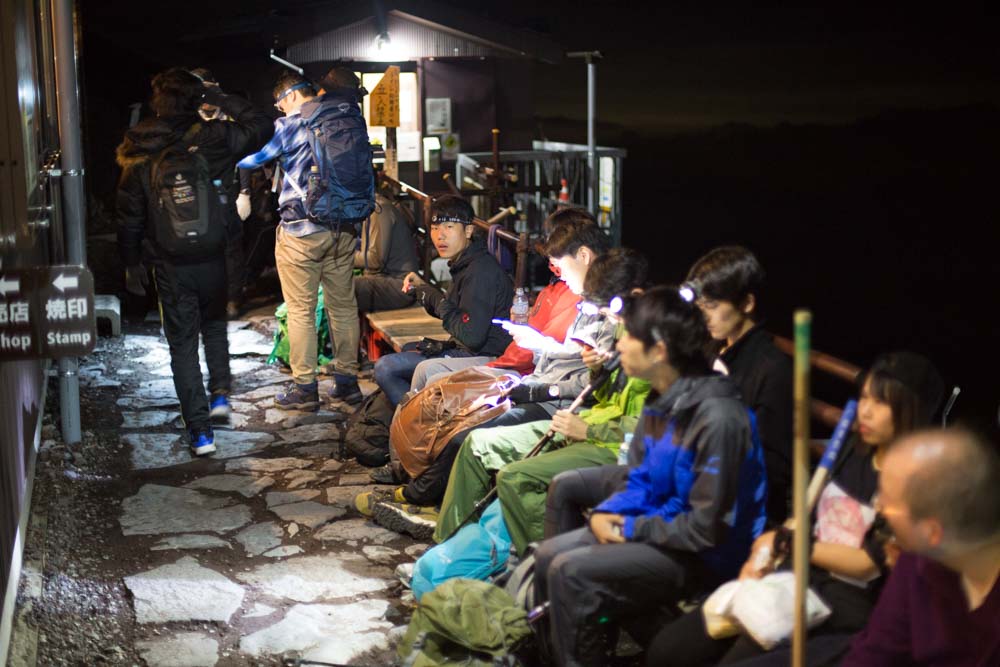
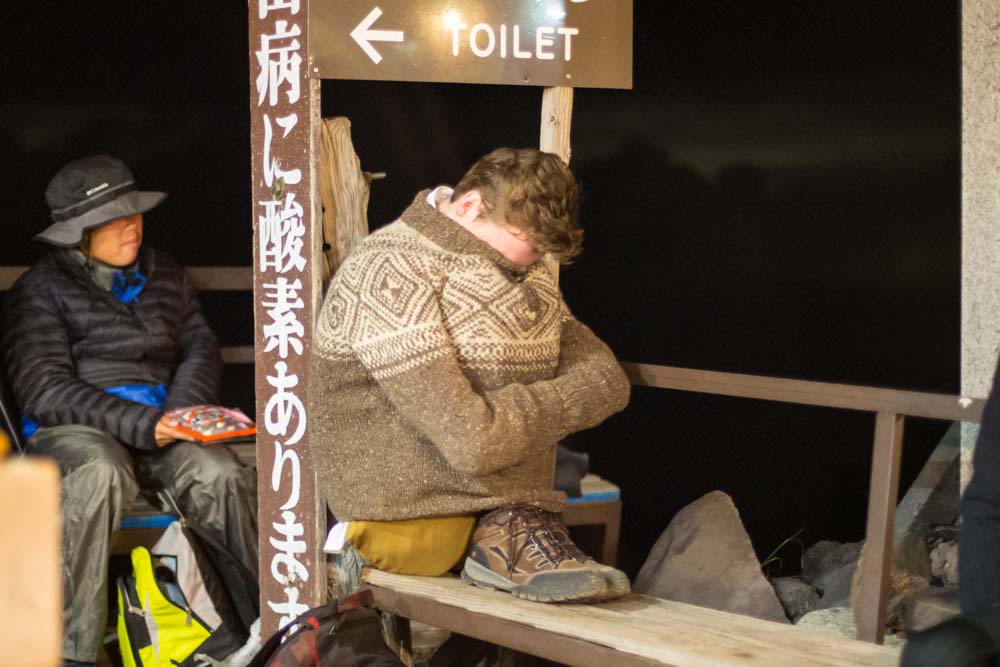
The huts at the top of the mountain do not open until 3am. They have a simple menu but, more importantly, let you stay inside in the relative warmth while you eat. For those making a night ascent, if you do find yourself making good time then it is advisable to hold back and rest at one of the lodges at the 8th stations because they provide much more cover from the wind than the exposed summit. The only things operating before 3am on the summit are vending machines which may or may not be sold out of hot coffee.
What do I need to bring?
Firstly, do not let the summer temperatures at sea level convince you to climb in nothing more than a T-Shirt and a pair of shorts. Temperatures can drop to close to zero at the summit, and that’s before you take into account the significant windchill factor. Marshals at the 5th Station will check your gear; if you are wearing light trainers or lack a waterproof jacket, you may be denied entry.
While it is critical that you prepare adequately for the freezing temperatures near the summit, the early stages of the climb (especially if you start the ascent during the day) will have you soaked in sweat if you set out in a large goose-feather down. Ideally, you should have several layers which you can put on as you climb the mountain.
The below is a list of essential clothing and other items to make a safe climb. Weather during July and August in Japan is unpredictable, and if you were caught in a storm then a lack of adequate clothing could lead to hypothermia.
Essential clothing
- A long-sleeve thermal vest
- A fleece
- A thin, lightweight down jacket
- A waterproof jacket
- Thermal inner trousers
- Lightweight hiking pants
- Waterproof trousers
- Thick socks
- Robust, waterproof hiking boots (mandatory)
- A thick, woolen beanie
- Gloves
Essential gear & other items
- 30+L backpack.
- A headlamp and set of spare batteries.
- Water. Huts sell water and sports drinks, but prices increase significantly with altitude.
- Food. Energy bars, chocolate, and bananas are essential.
- Cash. The lodges do not take credit cards. Cash is also required for the mandatory entry fee and the ¥200-300 charge for toilets.
Recommended
- Space blanket.
- Oxygen canisters.
- Trekking poles. Particularly helpful for the descent. Wooden sticks sold at stations can be stamped at each hut as a souvenir.
- Sunhat and sunglasses.
Should I climb in bad weather?
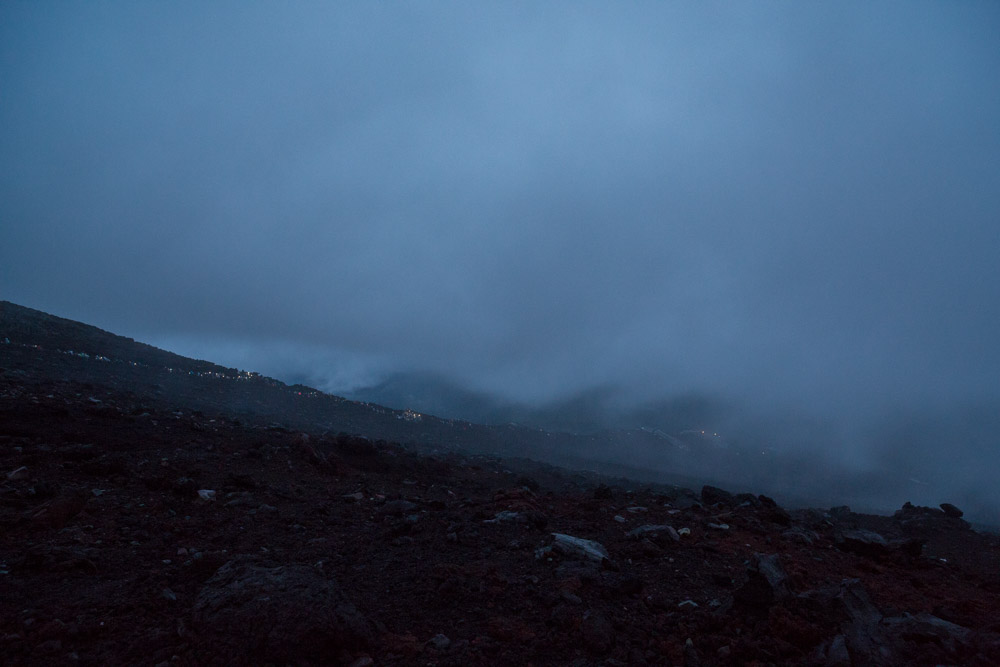
With the exception of stormy weather conditions, it is still safe to climb in the wind and rain so long as you are well prepared. The question is really, “Do you want to?” If the clouds descend over the mountain then you will be robbed of the views and the sunrise will consist of watching the mist turn from grey to white. Despite being the epitome of beauty from a distance, up close Mount Fuji is actually barren rock with little or no vegetation, so the only real prize will be the boast that you made it to the top. If your schedule allows, you may want to choose a day when the weather looks clear.
How do I get to Mount Fuji?
For the Yoshida Trail the easiest way to get to the Subaru Line 5th Station is from Shinjuku South Exit Bus Terminal. Direct buses operate between May and October and cost roughly ¥3,800 for adults. You will need to book these buses well in advance at highway-buses.co.jp.
If the direct bus is sold out, take a local bus from Fujisan Station or Kawaguchiko Station. A train from central Tokyo to either station takes about 2.5-3 hours. See http://bus-en.fujikyu.co.jp/ for details.
Rules & regulations
- Mandatory Entry Fee: A ¥4,000 fee is required for the Yoshida Trail, paid during the pre-registration process. An additional ¥1,000 donation is often requested at the trailhead.
- Digital QR Code: You must present your pre-registration QR code to enter the trail.
- Gate Closure: Gates close at 4:00 PM for those without hut reservations.
- Toilet Fee: A ¥200-300 donation is requested for use of the toilets along the route.
- No camping or lighting of fires is allowed on the mountain.
- All rubbish is to be taken home with you.
- Taking rocks or fauna as souvenirs is strictly prohibited.